Overnight Oats

Do you find that weekday mornings are rushed?

If so, you're not alone. Most families I work with name this (and weeknight evenings) as the most harried times of the week.

Usually I share recipe ideas that can help with weeknights.

But I've recently given overnight oatmeal a try and I'm loving this! I've totally jumped on the bandwagon. And I'm sharing the recipe with you so you can jump aboard too.

Prepared the night before, and with no cooking required, overnight oats are fantastic!

Made with rolled oats, it's a minimally processed, whole food way to start the day. Much healthier than most boxed cereals and those instant oatmeal packets.

And, it travels well. Which is perfect if you find that you can get your kids fed in the morning but you struggle to get something into yourself. I know that many people rely on smoothies in this situation. But I've always found that I'm hungry again by about 10am when I've had a smoothie for breakfast. Not so with overnight oats - I'm full until noon (or later)!

This recipe is really more of a technique. Mix and match proteins and fruits for variety and to find your favourite combination.

Overnight Oatmeal Directions:

Oats:

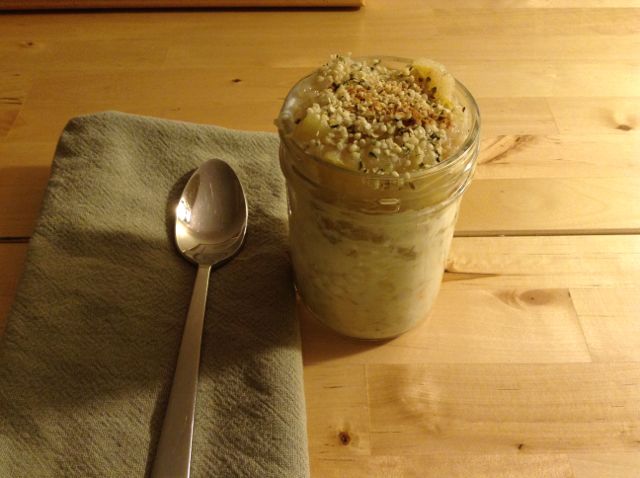
  • Combine equal parts rolled oats with yogurt and milk in a bowl or the container that you'll take this in to go (I carried mine with me in the mason jar). A generous adult serving is 1/3c up oats, 1/3 cup yogurt, 1/3 cup milk (or skip the yogurt and use 1/2 cup or more of a plant-based milk alternative, such as oat milk). For kids, start with 1/4 cup of each ingredient and adjust from there depending on your child's appetite.

Protein:

  • Choose a protein that you like. Examples include hemp hearts (my personal favourite), chia seeds, chopped or sliced nuts, nut butter, pumpkin seeds. Add it to the oat mixture.

Fruit:

  • Choose a fruit that you like. Examples include: applesauce (my personal favourite), berries, pomegranate, pumpkin puree. Add it to the oat mixture.

As the name of this dish suggests, prepare everything the night before. Place it in the fridge. The next morning, give it a stir and enjoy!

Get more healthy recipes here.

Picky Eater Success Tip: When to Serve Challenging Foods

picky-eater-success-tip

Maybe you’ve heard the statistic. It takes kids between 10 – 30 times of trying a new food before they like it. But did you also know that a study found that parents typically gave up offering a food after 5 times? Yes, they didn’t even make the minimum 10 times and certainly were nowhere near the 30 times.

I use the term “challenging food” to refer to a food that your child has either:

  1. Never seen before. This includes new recipes/dishes/ preparations of a food they’ve known previously. For example, if your child is familiar with raw and steamed carrots but has never seen roasted carrots before, roasted carrots would be considered a challenging food.

  2. Seen many (many) times but has never tried.

A mistake that I see parents make all the time is to only offer challenging foods at dinner. Offering challenging foods only at dinner is a mistake for several reasons. First, is the purely practical reason that if you’re working your way up to 10 – 30 presentations of a food and you’re only serving challenging foods at dinner, it’s going to take years before you reach those 30 times. No wonder parents in the research study gave up after 5 times. It seems like you’ve been trying to get your child to eat that food forever.

The second reason is that this contributes to kids’ bad behaviour at dinner. Kids are smart. They figure out pretty quickly that they can get their favourite foods at breakfast, lunch, and snacks. But, that they’ll be presented with scary stuff at dinner. So, they try every trick in their books to get out of eating at dinner. They misbehave. They announce that they aren’t hungry (and then whine about being hungry 20 minutes later). They complain that they’re too tired to eat. In other words, anything that they can brainstorm that will push your buttons and get them out of facing the challenging foods on their plate.

So, what’s the alternative? Use any meal or snack as an opportunity to present a challenging food. Breakfast, lunch, morning snack, afternoon snack, and bedtime snack are all fantastic opportunities to present a challenging food. Mix it up from day-to-day. One day at afternoon snack, serve some of the challenging food leftovers from dinner the night before. The next day, serve a new fruit at breakfast. One day, pack in your child’s lunch a couple of pieces of the raw veggies that you’re packing for your own lunch.

A couple of key tips to making this strategy work:

  • Always include familiar foods at the meal or snack. Remember: it’s unlikely that your child will eat the challenging food today. So, be sure that there are familiar foods from the other food groups that they can eat to satisfy their hunger and meet their nutrition needs.

  • Provide a small serving of the challenging food. I’m talking one baby carrot in their packed lunch. This limits the amount of food waste when they don’t eat it. And, a small serving is much less intimidating than a large serving. When your child does try, and like, the challenging food, as they say in showbiz, always leave them wanting something more. In other words, when your child does eat the challenging food, you can repeat that food soon and provide a larger serving.

Get more successful picky eater tips.

KY_PinTemplate_NEW2-100 (1).png

Love this post?
Pin it!

Save this post for later or share it with your friends and family on Pinterest.

Check out more of Kristen’s pins here.

Healthier Chocolate Nut Spread

chocolate hazelnut spread

You asked for a healthier alternative to the famous (and delicious) chocolate hazelnut spread (you know which one). Today I'm sharing not just one, but 4 alternatives. All are much lower in sugar and have no palm oil. Just in time for back-to-school. I mention back-to-school because you'll not only be looking for packed lunch ideas, but also breakfast ideas for rushed mornings and quick after school snack ideas.

All of these contain nuts or seeds. That's the foundation of this foodstuff afterall. Some preschools and schools are nut and seed-free, some are nut-free (i.e. seeds are okay), and some are peanut-free (i.e. nuts and seeds are okay). Always check with your individual facility to find out exactly what is and what isn't allowed.

An important note, especially if you are introducing these to picky eaters who already are familiar with the famous chocolate hazelnut spread, none of these taste exactly the same. So, don't try to pull a fast one on your little one and swap one for the other. They'll notice the difference - kids have keen observation skills with their food. Call this spread by a different name. This way they will be expecting something different.

A huge THANK YOU to student volunteer Carla for her help with these recipes!

Enjoy!

nutfree chocolate spread

Healthy Nut-Free Chocolate Spread

Ingredients:

  • 2 cups toasted sunflower seeds
  • ½ cup cocoa powder
  • 4 tbsp icing sugar
  • 1/2 cup milk (optional)
  • ¼ to ½ cup canola oil

Directions:

  1. In a pan over medium-high heat, toast the sunflower seeds until light brown and fragrant, about 3-4 minutes. Set aside to cool.
  2. Using a food processor, process the sunflower seeds until powdery. Scrape the sides.
  3. Add the cocoa powder, icing sugar, milk (optional), and canola oil. Blend until smooth.

Homemade Chocolate Hazelnut Spread

Ingredients:

  • 2 cups hazelnuts
  • 3 tbsp icing sugar
  • ½ cup milk (optional)
  • ½ cup cocoa powder
  • ¼ to ½ cup canola oil

Directions:

  1. In a pan over medium-high heat, toast the whole hazelnuts with their peels on for 5 minutes. Set aside to cool.
  2. Once the whole hazelnuts are cool, rub them in between a kitchen towel to loosen and remove the skin.
chocolate spreads_medmed

Habibi's Chocolate Tahini and Powerplant's Chocolate Sprouted Seed Spread

(Note: In the spirit of being fully transparent, both of these were given to me for free. I did not receive payment to review either. I'm super picky about what foods I'll share with you in my reviews.)

I brought both of these to my co-working space last week so that everyone could try them. Yes, there are perks to having dietitians as friends and co-workers! Both received very positive reviews. Some people preferred one and an equal number preferred the other. Both products have a short ingredient list with only recognizable foods. They're made with nuts or seeds, providing healthy fats (and no palm oil). Each has just a touch of sugar/sweetener. Check each product's websites for a listing of what stores you can find them in.

Powerplant's spread has an intense chocolate taste for you dark chocolate lovers. It has a chunkier texture but smooth mouthfeel. So it's perfect for spreading on a cracker but not on soft bread. It totally screams to be included in your next smoothie.

Habibi's Chocolate Tahini has a milder chocolate taste. A few people found the tahini and chocolate flavours fought eath other. Most of us thought it was delicious (me included). This spread is the more classically kid-friendly of the two.

Looking for more healthy, kid-friendly recipes? Check out my recipe page.

Picky Eater Tip: Be Good Company

picky eater tip be good company

When kids enjoy being at the family table, they’ll eat better. Period. This is a strategy for dealing with kids who are picky eaters (fussy eaters) that is amazingly powerful, yet seldom used. When the families whom I work with adopt this tip they love it. It immediately makes meal times way less stressful (for everyone). Everyone is freed up to enjoy the meal.

This strategy has the power to create the family meals for that you wish for. Yet, if you’re like most of the parents I meet, you feel that you need to be doing more to be good a good Mom or Dad. You’re under the impression that to do a good job of parenting your child around food, you need to cajole them into eating their veggies. To refuse allowing seconds of rice/noodles unless they take 2 more bites of their meat.

If this rings true for you, I have big news. You don’t have to be the food police. Your job is to plan, prepare, and provide meals and snacks. And, to join your child at the table to lead the way in creating a positive environment.

How to do this? Be good company. Have pleasant conversations. Yes, that includes having pleasant conversations with your partner too – your child doesn’t have to be the centre of your attention for every second of the meal.

What to talk about? Choose any topic except the food you’re eating. One of my favourites is to play good thing, bad thing. This game is also known by many other names. What it involves is everyone at the table taking turns telling about the best and worst things about their day. Even preschoolers love playing this game. And you’ll connect as a family.

No, this doesn’t mean that magically you’ll no longer be concerned about your child’s nutrition. It seems paradoxical, but the more you back off telling your children how many bites they need to eat, the better they’ll eat. Kids respond positively to you removing the pressure. Hunger motivates kids to eat. You don’t need to. When you follow this “be good company” strategy, it’s a weight off your shoulders and it’s empowering for your children.

When kids enjoy being at the family table, they’ll eat better. Period.

Get more successful picky eater tips. Sign-up for my e-newsletter today.

My Least Popular (But Very Effective) Picky Eater Tip

picky-eater-tip

I’ve been doing workshops for parents on picky eating for 8 years now. At every single picky eater seminar there is one strategy that always causes resistance with the parents in the audience. I continue to share it because it’s a very powerful strategy for minimizing picky eating. Yet I can almost hear the thud it makes when I describe it and it lands on the floor. The problem for which it’s a solution? How to get kids (particularly toddlers and preschoolers) to stay at the table for meals. It’s the solution for meals that go on and on forever because your child sits down, takes one bite, then pops up from the table to do something terribly important, then returns to the table, takes another bite, pops up from the table (and so on and so on).

So, what’s this successful, but unpopular strategy? Create a rule that all meals and snacks are eaten when sitting down. In other words: Stop. Eat. Then Continue On. Yes, I do mean snacks too. You may wonder why I continue to share this strategy knowing that it’ll be so unpopular. I share it because it really is successful for supporting kids to do a good job of eating. If we allow the common practice of letting kids eat snacks “on the run”, i.e. while in the car, in the stroller, you chasing them around the house spooning bite after bite into their mouths, we’re teaching kids that there is an alternative to sitting still at a table to eat. As seen through a toddler’s or preschooler’s eyes:

Why is it that sometimes can I eat while playing. But other times I’m told that I have to stop playing and sit at a table to eat (which is bo-ring).”

Create the expectation that all meals and snacks are eaten sitting down. In families who set this expectation, kids come to the table when called. They eat. Then, they continue on with their day (i.e. go back to playing). Meals and snack go much more smoothly and are less stressful because the kids aren’t constantly getting up from the table.

I understand the initial resistance that you may have to this strategy. In our super busy lives, how are we supposed to carve out time to stop and eat snacks? And it seems like I’m saying that you can never leave the house again, because you always need to be home to give snacks. Not true. Let me clarify.

Does this mean that you never get to leave the house again? No. In the summer this is especially easy. Stop at the park bench, picnic table, or spread out a blanket and enjoy a snack. Use similar ingenuity at indoor locations. For example, you can stop at the bench in the recreation centre foyer or use a table at the food court at the mall.

The important point is to stop. Don’t feed your child in the stroller, car seat, etc. And, don’t hand out a snack while your child continues playing. I know that it’s tempting to do so in our busy lives. But, it sets you up for more battles at meals and snacks. What seems like an efficient use of time in the immediate, actually costs you more time in the long run. In families who establish the stop-to-eat expectation, meals and snacks are very quick. And, they are much more pleasant. When it’s meal and snack time the kids simply get down to the business of eating.

Simply put: Stop. Eat. Then, continue on.

Get more successful picky eater tips. Sign-up for my e-newsletter today.

Be Careful What You Say to Picky Eaters

careful what you say to picky eaters

You need to be careful when it comes to talking with picky eaters, toddlers and preschoolers, about food. Words are powerful. What you say can help kids open up to trying new foods. Or, it can backfire and make them more resistant to trying new foods. So what are the right and wrong things to say? It’s likely not what you think.

Right Things to Say to Picky Eaters:

Do use creative marketing. There’s nothing like an unfamiliar word to make a kid say “I hate it!” before they even try a food. On the other hand, kids respond both to fun names and descriptive terms. Use their extremely keen observation skills to your advantage by using familiar and descriptive terms. For example, broccoli can be “little trees”. Name a dish after your child’s favourite superhero.

Here’s a great example that a friend of mine shared with me recently. Her son is 4. A couple of months ago she announced that dinner was lasagna. She hadn’t served her son lasagna before so he responded with the classic “Yuck, I want something else.” As a friend of mine, she knows better than to believe him and make something different. Instead, she put a piece on his plate and while he was watching she said “see, it’s pasta cake” and separated it into it’s different layers. Her son knows what pasta is. And, he definitely knows what cake is. Sure enough, once he saw that “lasagna” was something that he recognized, he happily ate it. So far, her son won’t eat lasagna. But he happily eats “pasta cake”. As he matures, he’ll become comfortable with the word “lasagna”. Until then she’ll happily include “pasta cake” in the family meal repertoire.

Wrong Things to Say to Picky Eaters:

Don’t talk about the nutritional benefits of a food. Most parents I work with and who attend my workshops unfortunately get this one wrong. Of course you care about healthy eating. You think about it when you choose what foods to serve. But don’t talk about it with your child. Studies show that if kids are taught about how healthy a food is, they are less likely to try it. And, if they do try it, they rate the taste as yuckier than if nothing was said. So, as tempting to talk about how the broccoli will make your child grow big and strong, make the effort to zip it. In this case, your actions speak louder than words. By serving broccoli, and eating it yourself, you are teaching your child that they should eat broccoli. No words are needed.

Don’t call multiple dishes by the same term. Toddlers and preschoolers are not yet able to classify things. It’s just not where they are at developmentally. Sure, we adults can use the term “fish” to mean salmon and halibut and tuna. While these foods all have very different tastes and textures, we adults can use one word “fish” to refer to them all. The developmental stage for toddlers and preschoolers means that they use a word to refer to one very specific thing. Very specific. If you use the word “fish” to mean “halibut” then that’s what they expect. If you then say “we’re having fish” and serve them salmon, they’ll freak out. Because you lied. The food in front of them is something very different than halibut – that’s obvious to see. And their natural reaction is to not want to try it. Instead, use the technique that I shared above. If you’ve always called halibut “fish” and you want to serve salmon, call it “pink fish”.

Book an information call today to find out how I can help with your child’s nutrition.

Will Kids Starve Themselves?

will-kids-starve-themselves

Some sayings are true. Some aren’t. You’ve likely heard people say “kids won’t starve themselves”. I hear it all the time. And, I rarely read an online conversation about picky eaters where someone doesn’t say this. Unfortunately this is one of those sayings that just isn’t true.

Will Kids Starve Themselves? Yes, Sometimes.

For some picky eaters, mealtimes have become very stressful. They’re left between the two choices of 1) being hungry or 2) facing the stressful meal situation. Some kids choose to go hungry. Yes, in other words, they starve themselves.

These kids either aren’t eating enough foods and their growth starts to falter. Or, they eat such a narrow variety that they aren’t getting the nutrients they need (even if they’re getting lots of calories).

Now the answer to the problem is not to force kids to eat more. Let me repeat that very loud and clear: THE SOLUTION IS NOT TO FORCE KIDS TO EAT MORE. More often than not that approach just increases kids’ stress, causing them to eat less.

Stress

What causes this stress? There can be many causes. That’s why I do a full assessment when working with families, because it’s important to identify and address the root cause. Some kids are sensitive souls who need to approach new foods gradually. Some kids are at a boundary-pushing stage and choose to engage parents in a battle of wills. Some kids miss out on learning specific chewing skills and find a variety of foods difficult to eat. Some kids have texture sensitivity and find certain food textures unappealing. I could go on listing causes.

I want to be really transparent here. I went back and forth many times about whether or not to write this article. I don’t write this to cause you more panic. The last thing that I want to do is cause more mommy guilt because guilt and shame get in the way of making change. I’m writing this because I do see kids who are starving themselves. So I feel the need to address the myth that’s spouted so very, very often by well-meaning advice givers.

Will Kids Grow Out of Picky Eating?

I also write this because I see so many families who could use my services. But they don’t seek help because they think that their child will “grow out of” their picky eating and that “kids won’t starve themselves”.

Lastly I write this because sometimes I see clients whose child is 7, 8, 9, or 10 years old and who is still a picky eater. Creating change for these kids is really, really hard (and progress is painstakingly slow). I wish so much that I could turn back the clock and work with these families when their kids are 2 and 3 years old. Not only could we prevent years of poor nutrition and stress for the child, we could have alleviated stress for the whole family. Because the whole family is affected when feeding isn’t going well with one child.

What’s important is that if feeding isn’t going well, you look for a solution to the problem. Don’t believe this myth that kids won’t starve themselves.

Check out my book where I share my simple-step-by-step solution for picky eaters (2-5 years old).

Healthy Kids Snack - Banana Roll Ups

healthy kids snack banana roll ups

Sometimes the classics are a classic for a reason. Bananas and peanut butter simply taste great together. Here's a fun way to bring this classic duo together in a healthy kids snack. I'm choosing to share it today because it's easy for young hands to manage. Perfect if you're gearing up to pack snacks or a lunch for little ones with back-to-school next week. This works well with peanut butter, other nut butters (e.g. almond butter) and the non-nut butters if your child attends a nut-free facility.

Hey, it's also a delicious idea for those of us who are young at heart :)

Banana Roll-Ups Ingredients 2 small tortilla wraps, whole wheat ¾ medium banana 1 tbsp natural peanut butter, nut butter or non-nut butter ½ tsp honey (optional) 1 dash cinnamon, ground

Banana Roll-Ups Directions

  1. Slice banana.
  2. Spread nut butter or non-nut butter on wraps.
  3. Top with bananas.
  4. Drizzle honey and add a dash of cinnamon.
  5. Roll (pack in lunch boxes) and enjoy.

Get more healthy, simple, kid-friendly recipes.

1 Simple Tip to Help Your Baby Gagging Less During Feeding

baby gagging

Pretty much all babies gag sometimes when then they first start eating solid foods. But, some babies gag more than others. Baby gagging can be very frightening for moms and dads and I get a lot of questions about it when I lead my Introducing Solid Foods workshops. I know that you are busy and exhausted so you like my blog posts short and to-the-point. If you’re really nervous about introducing your baby to solid foods, and/or are looking for a more fulsome description of gagging versus choking, I recommend coming out to one of my in-person workshops or getting in touch with me to find out more!

The focus of this post is on how to help babies who gag a lot to become less gaggy so that they can be more successful at eating solid foods.

For this tip, I’m assuming that you’re starting solids in that ‘just right’ window of about 6 months old. And, that your health professional has ruled out any medical cause for your baby’s gagging.

It’s often said that some babies have a “sensitive gag reflex”. But for most babies this isn’t the case. It’s not that their reflex is too sensitive, it’s that it’s in the wrong place.

You see, babies and adults have different mouth physiology. In adults, the majority of our tastebuds are on the tip of our tongues and our gag reflex is way in the back of our mouths. A fun way to test this is to place food in different parts of your tongue and notice how differently it will taste.

In babies, the majority of their tastebuds are at the very back of the mouth and their gag reflex is at the front of their mouth. This makes sense because for the first months of life babies are nipple-fed (either breastfed or bottle). To feed, babies place nipples to the very back of their mouths. So Mother Nature has the tastebuds at the back, where baby will taste their breastmilk/formula. The gag reflex is at the front of the mouth where it’s out of the way for nipple-feeding and where it protects babies from putting items in the front of their mouths that they could choke on.

Starting at about 4 – 6 months, the gag reflex and tastebuds migrate in opposite directions to swap places into the grown-up positions.

Most gaggy babies don’t have overly sensitive gag reflexes. Instead, their gag reflexes are still too far forwards.

What stimulates the gag reflex to move backwards? Having things in your baby’ mouth. Particularly things that your baby can stick towards the back.

So, your baby sticking their hands (and feet) in their mouth is really them working to move their gag reflex backwards. So is mouthing Sophie the Giraffe and other chewable toys that babies can stick deeper into their mouths. Toys like teething rings that stay at the very front of their mouths won’t help because it’s the presence of things ever deeper into your baby’s mouth that stimulates the backwards movement of their gag reflex.

So what’s the 1 tip to help baby gagging?

Let them play with toys they can safely stick in their mouths.

Now to be clear, I’m not recommending that you allow your baby to chew on things that they can choke on. I said “safely stick in their mouths”. What I’m recommending is to allow your baby to play with chewable toys and other objects that can safely go further back in their mouths. You want to look for long things that your baby can’t get a bite off of. Examples include:

  • Their own hands (and your fingers).
  • Sophie the Giraffe.
  • Toy key rings.
  • The spoon that you feed your baby with.
  • Whole, big, raw carrots or parsnips (big enough in diameter that your baby can’t bite off a chunk).
  • Ice cubes in a mesh feeding bag (I only recommend plain water ice cubes, not frozen foods).

Given the opportunity, babies will do lots of chewing on these objects. Know that they’re not just playing. They’re playing with a purpose. Playing is their job at this age. Your baby is playing with the purpose of developing the skills to eat.

3 Ways to use Farmers’ Markets to Get Your Child to Eat Veggies

3 Ways to use Farmers’ Markets to Get Your Child to Eat Veggies

It’s the height of summer and farmers' markets are approaching their peak. Perhaps you already shop at your local farmers’ market. Or, you’ve been meaning to check out the one in your neighbourhood. I’ve been a big fan of farmers’ markets since before the locavore movement made it cool. I have fond childhood memories of waking up early, piling into the car, and driving out of the city to the big farmers’ market in the country. Shopping at farmers’ markets supports your local economy, builds food security, and promotes community. Farmers’ markets are also a fantastic opportunity to get your kids excited about vegetables – from toddlers to pre-teens. Here are 3 fantastic activities to harness the opportunity at the farmers’ market to maximize your picky eaters’ enthusiasm for veggies and fruit.

  1. Helping Hands. Let your little one pick your produce. For example, tell her that you need 10 potatoes (or 1 head of lettuce, or 5 pears, etc). Then, let her pick and bag the 10 potatoes. Encourage “help” from the vendor – ask him questions like “How do you pick the best potatoes?” or “How do you know that a watermelon is ripe?” This is a great way to engage the pickiest eaters because it doesn’t even involve tasting the food. However it gently gets them to explore and feel ownership for the veggies/fruit. Both of which help them move towards trying it.
  2. Different Varieties, Same Food. Another gentle way to help kids be open to trying new foods is to have a taste testing of different varieties of the same food. Choose a food that your child already eats. Then choose other colours and shapes of the same food from the farmers’ market. Prepare all the varieties and try them all, comparing them. Take cucumbers for example: pick up one each of field cucumber, lemon cucumber, long English cucumber, pickling cucumber, and any other variety that you can find. When you get home, cut slices of each variety and lay them out on a plate. Gather your family. Try each one. Describe all your senses – how do they look, smell, taste? Is one sweeter, one more sour, one have a thicker skin?
  3. Kids’ Choice. Let your child choose any one vegetable or fruit at the market. Let kids pick themselves, or have them talk with the vendors to get recommendations such as “what’s especially yummy today?” or “My favourite vegetable is broccoli and I don’t like radishes, what would you recommend that I try?” Prepare your child’s choice together later that day. Older kids can help research and choose recipes. This will inspire pride and ownership of this food which helps many kids be open to taste it. You may want to set a budget ahead of time – otherwise your child may choose the giant, $30 hubbard squash, LOL!

One final (and important) note: It’s all in the attitude. Yours. Do these activities with your kids in the spirit of fun and exploring. Not in the spirit of forcing. Their enthusiasm will soar. And, with their new-found enthusiasm, they may feel brave enough to try the veggies (and perhaps even like them).

Picky Eater Success Strategy: Deconstructed Dishes

This is a favourite picky eater success strategy. It really can help you make one meal for the whole family. I have no idea why many kids don’t like their foods to touch. Another mystery that stumps me is why when sauces touch foods it’s considered unacceptable, but dipping is fun and yummy.

These are just 2 of the common great unsolved mysteries of young children’ eating habits. You’ll drive yourself crazy if you try to figure out why it is this way. It’s equally futile to try to rationalize with your child about how peas that have touched chicken are no different than peas that haven’t touched chicken.

So don’t waste your time (and brain cells). Leave it be and trust that (eventually) they’ll grow out of it.

In the meantime you aren’t relegated to eating sauce-free meals. Or, making your child a completely different dish every night. Instead, serve your child deconstructed dishes.

Picky Eater Success Strategy: Deconstructed Dishes

What I mean by “deconstructed” is to serve your child all the same components of your meal – but in a manner so that they aren’t touching. Take a beef and broccoli stir-fry for example. Cook a small amount of the meat, broccoli, and other veggies in the pan before you add the sauce. Remove them and set aside. Continue cooking the stir-fry with the rest of the ingredients and sauce. On your child’s plate place each of the items so that they are not touching each other, i.e. some beef, broccoli, other veggies, plain rice, and a small amount of sauce (perhaps in a dipping container like a small ramekin or saucer). And, place a very small amount of the stir-fry with all the foods touching with the sauce on it (like you are eating it).

“Deconstructed” meals are a fantastic compromise because they:

  • Allow you to eat a wide variety of dishes.

  • Allow your child to join you in sharing dishes.

  • Make your child feel confident with food because he has control over what ingredients he does and doesn’t eat.

Book an information call today to find out how I can help your child.

Fresh Fruit Granitas

Fresh Fruit Granitas

Similar to a slushie but made with real fruit, granitas are super refreshing in the summer heat.

They’re easy to prepare. The only tricky thing is to plan ahead so that you’re home and you remember to break up the ice crystals every hour (I set the alarm on my phone to remind me).

Kids can help measure ingredients, push the buttons on the blender, and scrape the ice crystals.

The fruit flavor is strong in granitas. The recipes here are listed from the most mild to the strongest. If your little ones prefer mild flavours, stick to the melon granitas. The kiwi granita is so strong that it almost made my eyes water (which I enjoyed on a hot afternoon).

Fresh Fruit Granitas - Directions

The steps are the same for all the recipes:

  1. In a saucepan, combine sugar and water.
  2. Bring sugar water to a boil until the sugar is well dissolved.
  3. Remove from the heat and let cool for 10 minutes.
  4. In a blender, combine the fruit (removed from it’s peel and pits), fruit juice (or other liquid), and sugar water.
  5. Pour into a non-metal baking dish, such as a glass lasagna pan.
  6. Place in the freezer. Freeze for 1 hour.
  7. Remove from the freezer and scrape thoroughly with a fork, breaking up the ice crystals.
  8. Return to the freezer for 1 hour. Again, remove from the freezer and break up the ice crystals with a fork. Repeat at least 2 more times.

Fresh Fruit Granitas - Recipes

Cantaloupe

Adapted from: http://www.whiskaffair.com/2013/03/cantaloupe-lemon-and-mint-granita.html

1                      cantaloupe

1/4 cup          sugar

¼ cup             water

4 TBSP            fresh lemon juice

Raspberry-Watermelon

Adapted from: http://whipperberry.com/2013/06/raspberry-watermelon-granita.html

5 cups             cubed, de-seeded watermelon

2.5 cups          raspberries

½ cup             sugar

½ cup             cran-raspberry juice cocktail

(Combine sugar and cran-raspberry juice cocktail in saucepan.)

Pineapple-Mango

Adapted from: http://www.muybuenocookbook.com/2013/03/pineapple-and-mango-granita-blendtec-giveaway/

Juice from 2 limes

1/3 cup          sugar

1                      pineapple, peeled, cored and diced

2                      mangos, peeled, pitted, and diced

(There’s no heating the sugar in this recipe. Simply combine all ingredients in a blender.)

Kiwi

Adapted from: http://dhaleb.com/2010/03/

5                    kiwis

½ cup           sugar

½ cup           water

1 cup              club soda

2 teaspoons   lime juice

See more delicious, healthy recipes here.

How to Help Kids Stop Dawdling at Meals

How to Help Kids Stop Dawdling at Meals

Most parents ask me for help with getting their kids to actually stay sitting at the table (if that’s you, check out this blog post). But every once and a while parents ask me for help with the opposite problem. Their child takes forever to eat. Every meal is a long, drawn out affair with long minutes going by between each bite. Every time you go to take their plate away they take another bite or two. You feel torn amongst letting them get enough to eat and actually moving along with the day. If this sounds like you, here’s a strategy to help your child eat enough during a reasonable mealtime.  

Step #1: Check Your Expectations. For us adults, the mechanisms of eating are easy. We move the muscles in our mouths and throats to eat without even thinking of it. And, we have the dexterity to use utensils with ease.

Toddlers still are learning the mouth control for eating. So it can take longer to chew and swallow safely. That’s exactly why we have the recommendations of not giving choking hazards to kids under 3 years old.

Preschoolers and school-age kids have mastered chewing and swallowing. But they are still mastering utensils. Expect them to take longer to eat when a meal involves utensils.

Step #2: Use a Visual Clock. Have you taken into account the extra time for mouth coordination and utensil use and determined that you have an honest to goodness dawdler? Here’s a technique that I’ve used with lots of kids to help them learn to manage their mealtime. It’s quite simple really. Kids this age do well with visual cues. This technique stops you from nagging that it’s time to finish up (and prevents kids from learning to tune you out). You simply set a timer, let kids see it counting down, and kids learn to manage completing their task (in this case, eating) within the allotted time. Older kids can follow a simple timer countdown on a cell phone or tablet set up on the table. Younger kids need a visual that doesn’t involve numbers. There are a number of apps and devices available to create a visual representation of a clock. An example of a product is: http://www.timetimer.com/store

To look for apps simply search for “visual timer” in your device’s app store (iTunes, Google Play).

To use the visual clock, introduce the new rule to your child then follow-through. Expect them to get it wrong a few times as they experience the learning curve. During this transition, don’t let them continue eating after the timer is done. Because they will likely be a bit hungry, do plan an extra big snack and, if you can, move snack time up a bit.

Kids are smart. They learn how to regulate their meal time within a few days.

Sign up for my e-newsletter for more tips on feeding kids.

4th Annual Home-made Popsicles (a.k.a. Ice Pops, Paletas)

Home-made popsicles, healthy, no sugar

I love that the healthy home-made popsicles trend is continuing (also known as ice-pops or paletas). Have you jumped on board? It's a fantastic way to enjoy some fruits and veggies. All these recipes are delicious. You won't believe that they have no sugar. Kids often love to help make them too. Here are 4 new home-made ice pop recipes for you to enjoy this summer. In case you're wondering why there are 4 recipes but only 3 in the picture, I ate all the banana-strawberry-orange ones before taking the photo :)

Home-Made Popsicles Directions

All the steps are the same for all home-made popsicles. And they're very easy:

  1. Combine ingredients in a blender.
  2. Blend until smooth.
  3. Pour into the ice-pop molds.
  4. Freeze.
  5. ENJOY!

Home-Made Popsicles Ingredients

Healthy Creamsicle

This simple 3 ingredient recipe is inspired by one of my childhood favourites – creamsicles. But unlike creamsicles, the only sugar in this recipe is that naturally found in orange juice.

  • 1 cup coconut milk
  • 1 cup orange juice
  • ½ teaspoon vanilla extract

Banana-Strawberry-Orange

Use ripe bananas and in-season, local strawberries and these are naturally sweet – no added sugar is needed.

  • 1 medium banana
  • 10 strawberries
  • ½ cup orange juice

Watermelon-Cucumber-Spinach

Don’t let the deep green colour of this recipe discourage you. It’s my favourite of the 4 recipes here – super refreshing and subtly sweet.

  • 2 cups watermelon, cubed
  • 6 large spinach leaves, thick stems removed
  • 2 inches cucumber, peeled and seeds removed
  • ½ cup coconut water

Pink Grapefruit

This recipe doesn’t need to be blended. Simply juice the grapefruits and combine with the soda water in a pitcher. Pour into the molds and freeze. If you find pink grapefruits too sour, you can substitute freshly squeezed orange juice.

  • 1 cup freshly squeezed pink grapefruits (approx 3 grapefruits)
  • 1 cup soda water

See more healthy, delicious recipes for home-made ice pops.

How Much Should You Focus on Your Child’s Table Manners?

Before I chat about child table manners, I want to explain this photo. Yesterday I had the opportunity to see Ellyn Satter speak live. Ellyn's work is the foundation for mine. She's easily the most influential person in my career. And while I've thoroughly studied her work and used it with families for more than 7 years, I had never met her. By the time that I was finished university, had started to pay down my student loans, and could afford to travel to a US destination for her in-person training seminars, she retired. But yesterday she came out of retirement to present in Vancouver. You bet that I was going to be there - I may have been the first to register :) The table manners question was asked of her, and it was fantastic to see that she responded with the same answer as I give parents.

Table manners, like most matters of etiquette, can cause a strong reaction in us - really getting under our skin. When it comes to table manners, parents usually approach me in two ways (which really are about the same thing). Either they ask about how to best teach kids to have good table manners. Or, they’re embarrassed about their child’s messy eating and apologize to me for it.

When it comes to table manners, the best course of action is to not sweat about it. Like many other things, your actions speak louder than words. Kids naturally have an internal drive to master things and grow up. Eat together with your child on a daily basis. Use good table manners yourself – use utensils, a napkin, say “please” and “thank you” when you ask someone to pass you the pepper, don’t get up and down from the table like a jack-in-the-box. Your child will pick up your good habits.

That is, as long as they aren’t staring at a screen during the meal (iPad, phone etc).

Don’t sweat your child’s messy eating. It’s normal for kids to use a combination of utensils and fingers into the school-age years, depending on the food and how hungry they are. And like all things, some kids learn to use utensils faster than others.

The most important factor for kids to learn to love healthy eating is to enjoy eating at the table. This requires the table to be a pleasant place. Constant nagging about table manners (“elbows off the table”, “use your fork”, etc) can really get in the way of kids enjoying meals.

It takes a lot of effort to organize yourself to plan and prepare meals and snacks and to have an adult sit down with your child to eat together. Congratulate yourself for accomplishing this and know that over time your child will learn good table manners.

Sign-up for my e-newsletter to get more expert child nutrition tips.

How to Get Kids to Sit at the Table

Does Canadian Milk Contain Hormones?

How to get kids to sit at the table. A common question that I get is how to get kids (particularly toddlers and preschoolers) to come to (and stay at) the table for meals. The best way is to set a rule that all meals and snacks are eaten at a table. As seen through a toddler’s or preschooler’s eyes: “Why is it that sometimes can I eat while playing. But other times I’m told that I have to stop playing and sit at a table to eat (which is bo-ring).”

Create the expectation that all meals and snacks are eaten at the table. In families who set this expectation, kids come to the table when called. They eat. And then they continue on with their day (i.e. go back to playing). Meals and snack go much more smoothly and are less stressful because the kids aren’t constantly getting up from the table.

Does this mean that you never get to leave the house again? No. In the summer this is especially easy. Stop at the park bench, picnic table, or spread out a blanket and enjoy a snack.

Use similar ingenuity at indoor locations. For example, you can stop at the bench in the recreation centre foyer or use a table at the food court at the mall.

The important point is to stop. Don’t feed your child in the stroller, car seat, etc. And, don’t hand out a snack while your child continues playing.

I know that it’s tempting to do so in our busy lives. But, it sets you up for more battles at meals and snacks. What seems like an efficient use of time in the immediate, actually costs you more time in the long run.

In families who establish the stop-to-eat expectation, meals and snacks are very quick. And, they are much more pleasant. When it’s meal and snack time the kids simply get down to the business of eating.

Simply put: stop, eat, then continue on.

Sign-up for my e-newsletter to get more child nutrition tips.

Don’t Put Your Child Under the 2-Bite Microscope

Don’t Put Your Child Under the 2-Bite Microscope

Gathering around the table to share food, stories and laughter can be a very enjoyable experience. But mealtime can be a stressful time if you’re under the 2-bite microscope. What’s the 2-bite microscope? It’s what I call it when parents’ entire interaction with their kids is about the food - how much they have or haven’t eaten. As a parent it’s easy to fall into this trap. After all, you’re concerned about your child’s nutrition.

You’ll know if you’ve fallen into the 2-bite microscope trap if you catch yourself telling your child how many more bites they need to eat.

Time and again I’ve seen that kids who are under the 2-bite microscope don’t eat well. There’s just too much pressure. It seems paradoxical, but the more you back off, the better they’ll eat.

When I say back off, I don’t mean silent meal times. Or, leaving your child alone at the table. What I mean is being good company. Have pleasant conversations. Yes, that includes having pleasant conversations with your partner too – your child doesn’t have to be the centre of your attention for every second of the meal.

What to talk about? Choose any topic except the food you’re eating. One of my favourites is to play good thing, bad thing. This game is also known by many other names. But, what it involves is everyone at the table taking turns telling about the best and worst things about their day. Even preschoolers love playing this game. And you’ll connect as a family.

When kids enjoy being at the family table, they’ll eat better. Period.

Sign-up for my e-newsletter for more tips on supporting your child to be a good eater.

How Much Should I Let My Child Eat?

How Much Should My Child Eat?

I want to confess something. It breaks my heart when I hear a child ask her parent if she’s full. I silently scream. Unfortunately, I’ve seen it many times. Here's the answer to "how much should I let my child eat?"

How Much Should I Let My Child Eat?

The overwhelmingly vast majority of kids are born knowing when they are hungry and when they’re full. It’s only through social learning that we lose our ability to listen to our bodies and learn to overeat.

When I hear a preschooler ask her parent if she’s full, I know that she’s lost her ability to listen to her body. She'll now look to external cues to tell her when she’s full.

It takes trust to let your child choose how much to eat. You’re a good parent. You care about your child having enough to eat. So I know that it’s so very tempting to tell her that she needs to finish those peas or eat two more bites of chicken before she’s done.

It doesn’t help that she’ll likely be completely inconsistent in how much she eats. Eating lots some days (what my Grannie called “having a hollow leg” – as in “I don’t know where the child puts all that food. She must have a hollow leg”). Other days she’ll eat almost nothing (which causes parents to say “I think that she must pull nutrients out of the air like a plant – she certainly isn’t eating them”).

Sure, sometimes kids will get it wrong. Sometimes they'll choose a more interesting activity and not eat enough. Other times they'll eat too much and get a stomach-ache (or perhaps even throw up). It's just like everything else in life - kids sometimes get things wrong. Giving them the opportunity to practice lets them learn from their mistakes. If you're consistently offering 5 - 6 opportunities to eat each day in a low-stress setting, they'll get the nutrition that they need over the course of a day.

Hold back from commenting on the amount of food that your child is eating. Let her gain food-confidence by controlling how much she eats.

In other words, how much should you let your child eat? As much (or as little) as their tummy tells them to eat.

Showing that you trust her and letting her build food-confidence is an amazing gift that you can give.

Looking for more strategies for picky eaters? Get tips emailed to you on how to support your child to become a good eater.

Baked Avocado Eggs

Baked avocado egg

I'm a long-time lover of avocados and so I'm excited to see that many others have realized how delicious they are. And, that their healthy fat is not something of which to be afraid. Browsing around Pinterest for some cooking inspiration (I love Pinterest), I found this recipe. I like to give credit where credit is due, so here's the original recipe: http://www.popsugar.com/fitness/Baked-Eggs-Avocado-Recipe-30787252 This baked avocado egg recipe has all the creamy deliciousness of an eggs benny - without all the work of Hollandaise sauce. In other words, it's a perfect recipe for Easter breakfast. Finger Food Version: Cook a few minutes longer until both the whites and yolk are set (it's recommended that babies under 12 months don't have runny egg yolks). Cut the egg and avocado into finger-food size pieces. Or, spread on long, skinny pieces of toast.

Baked Avocado Egg Ingredients:

1 avocado

2 eggs

salt & pepper

Optional: toast

Baked Avocado Egg Directions:

  1. Preheat the oven to 425 degrees.
  2. Slice the avocados in half. Remove the pit. Scoop out enough flesh from the avocado,  so the egg will fit in the centre. Reserve this flesh for another recipe/snack.
  3. Slice a small piece off the back of the avocado halves so that they will sit flat without rolling around. Place the avocados in a small baking dish, making sure they fit tightly. If your dish is too big, scrunch up a piece of tin foil to fill the space.
  4. Season the avocado halves with salt and pepper. Crack an egg into each avocado half.
  5. Place in the oven and bake for 15 to 20 minutes. Cooking time will depend on the size of your eggs and avocados. And, how you like our eggs cooked.
  6. Enjoy scooped directly out of the avocados. Or, spread on top of toast.

Check out more healthy, delicious recipes here.

Sugar-Free Easter Ideas

sugar-free easter ideas

Halloween, Christmas, Valentine's Day, Easter, there are so many holidays that involve a lot of candy. I'm often asked by health-conscious parents how to handle these holidays. Here are some sugar-free Easter ideas to keep all the fun of the season, without all the sugar.

Sugar-Free Easter Ideas: Create Non-Candy Fun

There are lots of ways to celebrate Easter that don’t involve sweets. Examples include:

  • Join your child to decorate the house with Easter themed decorations.
  • Colour Easter Eggs. Extend the fun by first creating your own natural dyes.
  • Plant some veggies in the garden or pots.
  • Bake a low-sugar treat such as carrot cupcakes.

Next week I'll be sharing a fun, healthy (and delicious) recipe that's perfect for Easter.

Take Advantage of Toddlers’ and Preschoolers’ Naiveté

Toddlers and preschoolers have very short attentions pans. Use this to your advantage. Who says that Easter egg hunts need to involve finding more than 3 – 5 small pieces of chocolate? If we’re really honest, it’s we adults, not the kids, who enjoy longer games because we have a vested interest in reliving our childhoods.

Sugar-Free Easter Ideas: Create a New Family Tradition

Who says that it has to be chocolate that kids find in Easter egg hunts. Why not hide the eggs that you dyed? Or, how about hiding snack-size Ziploc baggies full of mini carrots? Easter bunnies eat carrots after all. Get your thinking cap on to invent a new, fun family tradition that doesn’t involve candy.

Sugar-Free Easter Ideas: Include Non-Candy Basket Stuffers

There are all sorts of fun and seasonal ideas to include in Easter baskets. Some examples include:

  • Spring or Easter-themed stickers
  • Arts and craft supplies
  • An Easter-themed colouring book and crayons
  • Veggie or flower seeds
  • Baby animal figurines
  • Story books on seasonal topics such as baby animals or planting seeds
  • Hair accessories in spring colours

Sign up for my e-newsletter and get more healthy nutrition tips for toddlers and preschoolers directly to your email inbox.